Have you ever been captivated by the explosive power of a volcanic eruption? If so, you'll find that creating a volcanic eruption experiment at home is not just fun; it's an exciting way to explore the science behind these natural phenomena. This guide will help you step into the shoes of a scientist by demonstrating how to replicate a volcanic eruption safely and effectively, all with materials you likely already have at home.
This step-by-step approach will not only appeal to the curious mind but also serve as an excellent opportunity for hands-on learning. Whether you’re a parent looking for an engaging project with your kids or just someone fascinated by the wonders of nature, this experiment promises to make education an adventure like no other!

'Volcano: The Eruption and Healing of Mount St. Helens' offers a captivating look into one of the most significant volcanic events in U.S. history. This insightful book delves into the catastrophic eruption, exploring the geological forces at play and the subsequent environmental recovery. Perfect for enthusiasts and scholars alike, it combines vivid imagery with fascinating information, highlighting both the destructive and restorative powers of nature. Readers will gain a deeper understanding of volcanic activity and its profound impact on the landscape and ecosystems.
Materials Needed
Creating a volcanic eruption experiment at home is not only fun but also educational. To recreate this natural phenomenon, you will need a mix of common household items and a few other scientific materials. Here’s a detailed list of what you will need:
- Plastic bottle or small container: Use this as the volcano's core. It holds the reactants you will combine to create the eruption. A soda bottle works perfectly and allows for an exciting display of the reaction.
- Baking soda: This is the primary ingredient that will react with the vinegar to produce carbon dioxide gas, mimicking volcanic lava. Prepare at least a few tablespoons for the best effect.
- Vinegar: When mixed with baking soda, vinegar acts as an acid and leads to the eruption effect. A cup or more will create a larger eruption.
- Dish soap: Adding a squirt of dish soap to your mixture will help create foam, making the eruption look more like flowing lava. It adds to the visual appeal of the experiment.
- Food coloring: Use food coloring to give your "lava" a realistic appearance. Red or orange work great for simulating molten lava, while green could represent unusual volcanic activity!
- Tray or large dish: Set your volcano in a tray or large dish to catch any overflow during the eruption. This helps keep your workspace clean and allows for easy cleanup.
- Spoon or stirrer: You’ll need something to mix your ingredients before the volcanic eruption occurs. A spoon can also be used for layering baking soda and dish soap.
- Safety goggles: While this experiment is generally safe, it’s always a good practice to wear safety goggles to protect your eyes from any splashes.
With these materials, you will be well-equipped to recreate a volcanic eruption at home. The combination of baking soda and vinegar generates a dramatic, bubbling reaction that's sure to captivate your audience and provide a visual representation of geological processes.
- Optional items: You might consider using modeling clay or papier-mâché to create a realistic volcano shape around your plastic bottle, enhancing the visual aspect of your experiment.
Safety Precautions
When engaging in your volcanic eruption experiment at home, safety must be a priority due to the use of various substances that can react in unexpected ways. Start by wearing appropriate personal protective equipment, including goggles and gloves. Goggles will protect your eyes from splashes and irritants caused by acid or baking soda reactions, while gloves will prevent skin contact with these materials, avoiding irritation or burns. Always seek to use lab-grade gloves if available, as they provide better protection against chemicals.
Conducting your experiment in a well-ventilated area is crucial, especially if you're using baking soda and vinegar, or any other chemical agents. The reaction can produce gases that may be harmful in high concentrations. An open window or a fan can ensure adequate airflow, reducing the chance of inhaling any potentially irritating vapors. Additionally, having a fire extinguisher and a first-aid kit readily available can help you respond immediately in case of an accident. Keeping emergency contacts at hand is also wise, providing reassurance should an unexpected situation arise.
- Always wear safety goggles and gloves.
- Choose a well-ventilated area for the experiment.
- Have a fire extinguisher and first-aid kit accessible.
- Maintain a safe distance from the eruption site during the demonstration.
- Keep a container of water nearby to manage small spills or reactions.
Experiment Setup
To create a volcanic eruption experiment at home, you’ll need a few common materials and to establish the right environment for your experiment to be both safe and effective. Start by selecting a designated area in your home—preferably outdoors or in a space that is easy to clean, such as a garage or backyard. Ensure that the area is away from delicate items, as the experiment can become messy. A flat surface like a plastic table or a large tray works best for keeping everything contained.
Gather the following materials for your volcano experiment, inspired by "Volcano: The Eruption and Healing of Mount St. Helens":
- A medium-sized container (like a plastic bottle) to act as the volcano.
- Baking soda, which will serve as the primary eruptive agent.
- Vinegar, which will react with baking soda to create the eruptive effect.
- Food coloring (red or orange) to simulate lava.
- A tray or large piece of cardboard to catch spills.
- Plastic cups for pouring the ingredients.
- Measuring spoons for a precise amount of baking soda and vinegar.
- Optional: Modeling clay or paper-mâché to shape a mountain around your container.
Set up your volcano by placing the medium-sized container in the center of your tray. If you choose to create a mountain shape around the container using modeling clay or paper-mâché, ensure it securely holds the container intact, creating a hollow space at the top for the eruption. After assembling your volcano, measure out a few tablespoons of baking soda and pour it into the container. Add a few drops of food coloring to the baking soda to prepare for the visual effect. In a separate cup, measure out a half cup of vinegar. When you're ready for the eruption, pour the vinegar into the container with the baking soda mixture and observe the reaction! Make sure to wear goggles if you desire extra safety precautions.
- Choose a day with minimal wind if performing the experiment outdoors.
- Wear old clothes, as the food coloring could potentially stain.
- Have a sponge or paper towels handy for quick clean-up after the bubbling stops.
Creating the Volcano
Creating a model volcano to mimic the famous Mount St. Helens is an exciting project that brings science to life. Begin by gathering your materials: a plastic bottle (to serve as the volcano's core), clay or playdough (for the exterior shape), newspaper, water, tempera paint (in earthy tones like brown, red, and green), and baking soda and vinegar (for the eruption simulation). The combination of these materials will help you form a realistic and eye-catching volcano.
Start by selecting a sturdy base, like a cardboard piece, to keep your volcano stable during the eruption. Place the plastic bottle in the center; this will be the volcano's vent. Using the clay or playdough, mold it around the bottle, shaping it into a conical structure. Aim for a height of about 12 inches, tapering it as you reach the top. After constructing the volcano, cover it with strips of newspaper dipped in a flour-water mixture to create a rough texture resembling actual volcanic rock. Let it dry completely. Once hardened, use tempera paint to add earthy colors—brown for the body and bright reds or oranges near the top to represent lava flow. This layering of paint will give your volcano a realistic and visually appealing look.
- Ensure the base is sturdy before starting the volcano to avoid spills.
- Experiment with layering different shades of colors for a more dynamic appearance.
- Consider adding miniature trees or figures around the base for added context.
Eruption Process
Creating a volcanic eruption experiment at home involves simulating the natural processes of a volcano, similar to the eruption and healing of Mount St\. Helens\. The key chemical reaction we will be using is between baking soda (sodium bicarbonate) and vinegar (acetic acid). This reaction generates carbon dioxide gas, which creates the bubbly and explosive effect that mimics a volcanic eruption. Here’s how to mix the ingredients effectively and safely:
Start by gathering the following materials:
- 1 small plastic bottle (to act as the volcano's core)
- 2 tablespoons of baking soda
- 1/2 cup of vinegar
- Red food coloring (to represent lava)
- Dish soap (optional, for extra fizz)
- Tray or large container (to contain the mess)
First, place the plastic bottle in the center of the tray to catch any overflowing mixture. Add 2 tablespoons of baking soda into the bottle. If you’d like an extra frothy effect, you can add a few drops of dish soap at this stage. Next, mix a few drops of red food coloring with the 1/2 cup of vinegar in a separate container. Slowly pour the colored vinegar into the bottle with baking soda. Timing is essential; as soon as the vinegar mixes with baking soda, the eruption will begin within seconds. Stand back and watch as the bubbling reaction creates a spectacular “lava flow” that spills over the edges of the bottle, reminiscent of the explosive nature of eruptions like that of Mount St. Helens.
- Ensure you do this experiment in an open or well-ventilated area.
- Consider wearing gloves and goggles for safety.
- Prepare to clean up afterward, as the reaction can get messy!
Observation and Recording
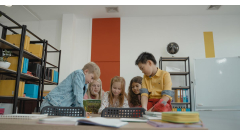
Engaging with a volcanic eruption experiment at home, especially one inspired by the transformation of Mount St. Helens, provides a fascinating opportunity for observation and recording. As the eruption occurs, gather around and encourage all participants to take detailed notes on various aspects of the eruption. Focus on the type of eruption, the color of the lava or materials expelled, and the height and volume of the eruption. Use visual aids such as photos or sketches, which can complement the written observations. This enhances understanding and retention of the experience.
To help streamline the observation process, setting up a dedicated journal or worksheet can be beneficial. Include sections for date and time, weather conditions, and specific observations, such as:
- Behavior of the erupting material (bubbles, flow rate, etc.)
- Sound of the eruption (explosive sounds, hissing noises)
- Surrounding environment (any reactions from plants, animals, etc.)
- Duration of the eruption
- Any changes over time (e.g., diminishing eruptions or new features)
Taking time to review these notes after the eruption allows for deeper insights into volcanic activity, helping to draw parallels with real-world phenomena observed at Mount St. Helens. Sharing and discussing individual observations with participants enhances collective learning.
- Consider passing around your journals for a group reflection session
- Highlight surprising findings or unique observations
- Encourage questions to promote critical thinking
Cleanup Procedures
After creating your volcanic eruption model using the Volcano: The Eruption and Healing of Mount St. Helens kit, it’s essential to clean up the materials used during the experiment thoroughly. This ensures both safety and cleanliness for your workspace and prevents any mess from lingering after the fun. Begin by gathering all materials used in the experiment, including baking soda, vinegar, food coloring, and any other components from your kit. Be sure to keep safety in mind as you dispose of items and clean surfaces.
- First, carefully collect all used materials, such as the empty containers that held baking soda and vinegar. Dispose of these materials according to your local disposal rules. For instance, food coloring and vinegar can usually be washed down the drain with water, but check local guidelines for any specific requirements.
- Next, wipe down the surface where the experiment was conducted using warm, soapy water to remove any residual substances. A cloth or paper towel can effectively catch drips and spills while ensuring that your workspace is safe for any future projects.
Once your surfaces are clean, focus on personal hygiene. It’s important to wash your hands thoroughly after handling any materials, especially if you used food coloring that can stain. Use soap and water, scrubbing for at least 20 seconds. Make sure to cover all areas of your hands, including under your nails and between your fingers. If any materials have splashed onto your clothing, change and launder items as needed to prevent stains.
- After washing your hands, be sure to rinse and dry any equipment or containers used during your experiment. This includes any mixing tools or spoons. If you used plastic items, consider recycling them if appropriate.
- Finally, inspect your workspace to ensure no materials remain scattered, securing a clean and safe environment for your next experiment or activity.
Related Products


Scientific Explanation
Understanding the science of volcanic eruptions requires looking at several key principles: pressure, chemical reactions, and gas formation. When magma, a mixture of molten rock, gases, and crystals, rises from deep within the Earth, it encounters lower pressure as it approaches the surface. This reduction in pressure allows gas bubbles to form within the magma. As these gas bubbles grow, they create an increase in pressure within the volcanic chamber. If the pressure becomes too great, it forces the magma upwards and ultimately leads to an eruption.
The materials in the magma are primarily composed of silicate minerals which, when heated, undergo various chemical reactions. These reactions can produce water vapor and other gases that contribute to the overall pressure. When the gases reach a threshold level, the eruption occurs, and magma is expelled violently, often creating a dramatic display as seen in the eruption of Mount St. Helens. The interplay of these elements—pressure building from gas bubbles, the chemical composition of the magma, and the sudden release of built-up energy—provides the basis for understanding how these powerful natural events occur.
- Magma forms deep within the Earth.
- Gas bubbles form as pressure decreases.
- Pressure build-up leads to eruptions.
- Chemical reactions within the magma produce gases.
- The eruption of Mount St. Helens is a key example of these principles in action.
Extensions and Variations
To enhance your volcanic eruption experiment using the principles illustrated in "Volcano: The Eruption and Healing of Mount St. Helens," consider exploring different scenarios that can influence the characteristics and intensity of your eruptions. A simple variation includes altering the basic ingredients of your volcano model. For instance, instead of using the standard baking soda and vinegar combination, try mixing hydrogen peroxide with yeast to create a "lava" that releases oxygen and can produce a frothy eruption. This shift not only demonstrates the role of different chemical reactions but also mimics the varied eruption styles observed in real-life volcanic events.
Another engaging extension involves the introduction of colorants and textures to the eruption. By adding food coloring or glitter to your mixtures, you can mimic ash clouds or lava flows more realistically. Experiment with the ratio of the reactive ingredients—more vinegar or a larger amount of baking soda could lead to explosive eruptions, while adjusting these ratios down might yield gentle flows.
- Create a layered volcanic structure using soil, sand, and pebbles to observe how stratified eruptions occur.
- Test the effects of different vinegar concentrations on the height and type of the eruptions.
- Incorporate a timer to measure the duration of each eruption and collect data to analyze the effects of modifications.
Discussion Questions
Engaging in a volcanic eruption experiment, such as the one inspired by the product "Volcano: The Eruption and Healing of Mount St. Helens," provides an excellent opportunity to delve into the science and implications of real-life volcanic events. Participants can reflect on a variety of questions that touch upon the broader impacts of volcanic activity. Consider the following:
- What are the immediate effects of a volcanic eruption on local ecosystems, and how do these effects play out over time?
- How do communities prepare for the possibility of an eruption, and what safety measures are typically implemented to protect residents and wildlife?
- In what ways do volcanic eruptions contribute to both destruction and renewal in their surrounding environments?
- How has the eruption of Mount St. Helens specifically influenced geological research, and what can other volcanoes teach us about the behavior of active geological features?
- What role do volcanic eruptions play in climate change, and how does ash fallout affect the atmosphere and vegetation?
Engaging with these questions not only enhances understanding but also promotes critical thinking about the complex relationship humans have with natural disasters and the resilience of nature. To further enrich discussions, the following points may be of interest:
- What historical volcanic eruptions have had significant impacts on societies, and how did those societies adapt in their aftermath?
- What modern technologies exist that help scientists monitor volcanic activity, and how effective are they in predicting eruptions?
Why We Chose This Product
Choosing to create this 'How to Guide' was inspired by the ever-enigmatic and majestic beauty of volcanic eruptions, exemplified by the famed Mount St. Helens. By diving into this fascinating world, it allows everyone to discover the captivating processes that play out beneath the Earth’s surface, while also igniting a passion for science and learning. The real beauty of this experiment lies in its simplicity and accessibility.
- Engages learners of all ages
- Requires common household items
- Encourages curiosity and experimentation
- Promotes scientific thinking and understanding
By documenting the eruption and its healing processes, reflected in products like 'Volcano: The Eruption and Healing of Mount St. Helens,' we can appreciate the balance of destruction and rebirth in nature. This guide not only teaches you how to create a spectacle but also instills a deeper respect for the power of our planet.
'Volcano: The Eruption and Healing of Mount St. Helens' offers a captivating look into one of the most significant volcanic events in U.S. history. This insightful book delves into the catastrophic eruption, exploring the geological forces at play and the subsequent environmental recovery. Perfect for enthusiasts and scholars alike, it combines vivid imagery with fascinating information, highlighting both the destructive and restorative powers of nature. Readers will gain a deeper understanding of volcanic activity and its profound impact on the landscape and ecosystems.